I have been spending a lot of time working on my website and am proud to be able to have it online. There is still a lot of work I plan to put into it, but it is ready for the public to see! Take a look at it for yourself. You can get a better idea of exactly what I do and more about who I am.
Take a look: www.karleighjohnstone.com
Wednesday, February 16, 2011
Tuesday, February 8, 2011
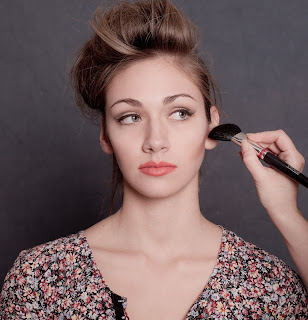
Creating Perfect Cheekbones
One of my favourite parts of make up application is sculpting the cheekbones. I like to start with contour, add blush and finish with highlight. I also like to exaggerate the highlight quite a bit.
Here is how I define the cheek bone step by step:
1. Contour

2. Blush


Did you find this post helpful? Questions, comments, feedback? I would love to hear them! Please comment or email me for more specific questions at karleigh@karleighjohnstone.com, or find me on facebook (Karleigh Johnstone, I am the only one).
Here is how I define the cheek bone step by step:
1. Contour

Use a powder about 2 shades darker than your skin tone and an angled contour brush to apply in a triangular shape under the cheek bone. It will look like this:

2. Blush
Using a powder blush start at the apple of the cheek and follow the cheek bone to the hair line. Try using a colour that mimics your skins natural blush, or for a bolder look try a brighter blush colour (I like to use bright pink). Here is how it will look:

3. Highlight
Finish by adding your highlight to the top of the cheekbone. I like to use a lot of highlight and make it obvious. This is what the finished cheekbone will look like:

Sculpting the cheekbone can create an instant face lift. Look at the difference between Carling's cheeks with and without contour, blush and highlight:
 |
| To your left: without contour, blush and highlight. To you right: with contour, blush and highlight. You can see that she looks more awake on the right side. |
Sunday, February 6, 2011
Make Up Kit Essentials: Building a Fabulous Make Up Kit *Part Four: Last Additions to Create a Perfectly Flawless Face
The next step to the perfect make up kit will consists of the last items you need to create a perfectly flawless natural look. Once you have gone shopping for these items, add them to the ones I have already suggested and set aside 15-30 minutes of play time. Practice makes perfect, you will be able to apply your make up more quickly when you get used to the application process. Before you know it, you will be ready for your close up.
Here are the final items I recommend:
Here are the final items I recommend:
- A Liquid or cream foundation
I have already suggested adding a powder foundation to your kit. Powders are a good start because they provide light coverage, and require minimal application time. When you want that "flawless face" it is best to invest in a heavier coverage foundation. Make sure you give yourself plenty of time - a "flawless face" should be rushed. Please refer to my foundation post series for light coverage, medium coverage, or full coverage foundation suggestions. Also, try products from my favourite brands:
- NARS
- MAC
- Smashbox
- Bobbi Brown *excellent for darker skin tones!
If you have an obviously uneven skin tone I highly recommend a full coverage foundation. Foundation can be applied with a brush, a sponge, or your fingers. I find a sponge easiest to use.
2. Setting Powder
I feel setting powder is a must when using a cream based foundation. It prevents foundation from moving and creasing throughout the day and allows eyeshadow, blush or other powders to blend easily. Setting powders can be colourless or tinted. The colourless powders are white and tend to slightly lighten the skintone, so I recommend a tinted powder. I use loose powder to set foundation, then a pressed powder through out the day if I start to glow.
Here are some loose powders I suggest:
- NARS Loose Powder
- MAC Set Powder
- MAC Select Sheer/Loose
- MAC Iridescent Powder/Loose *excellent if you want to keep a shimmer to the skin
- SMASHBOX Photo Set Finishing Powder SPF 15
- BOBBI BROWN Face Powder
- BOBBI BROWN Sheer Finish Loose Powder *Excellent for oily skin types
Loose powder should be applied with a powder puff, then the excess removed with a powder brush.
3. Blush
Figure out what your natural blush colour is (the colour your cheeks glow when you are embarrassed). Try to find a blush colour that is similar. Generally warmer skin tones should go for a orange or peachy blush, while cooler skin tones should go for a pink blush. Gold tones work well with darker skin tones, it will create a glow rather than a blushing effect.
I would recommend any of the following products:
- NARS Blush (powder)
- MAC Powder Blush
- SMASHBOX Blush Rush
- BOBBI BROWN Blush award winning blush! Matte finish
- BOBBI BROWN Shimmer Blush award winning blush!
I really like to emphasize the cheek bones. Apply blush starting at the apple of the cheek blending outward towards the hairline.
4. Contour
Choose a contour colour that is about 2 shades darker than your skin tone. Contour is used to create shadows on low points of the face, this is explained further is my past blog post Explaining Highlight and Contour. When defining cheek bones I like to contour first, add blush and finish with highlight.
I do not have specific product suggestion for a contour, I usually use a tanned colour blush, a pressed powder or a bronzer (bronzer is my last choice, but many people quite like using bronzer). Refer to my list of four brands under the foundations part of the post for look for products you like.
AVEDA's Petal Essence Face Accents plays the part of a highlight, blush and contour all in one. Use AVEDA's Inner Light Foundation Brush to apply smoothly over cheek bone (it is angled which is perfect, use the highest point of the brush for the highlight).
Now that you have an exceptional basic kit built, I am going to spend the next few posts showing you how to get the best use out of the products I have suggested. After that, I will suggest items to enhance your kit, compose an extremely useful set of make up brushes, as well as suggest mini kits for travel, a night out and everyday items to carry in your purse.
Always remember, make up is an expression of who you are, the inner beauty people don't always have the ability to see. You are beautiful, show that off by taking time to look your best.
Did you find this post helpful? Questions, comments, feedback? I would love to hear them! Please comment or email me for more specific questions at karleigh@karleighjohnstone.com, or find me on facebook (Karleigh Johnstone, I am the only one).
Subscribe to:
Posts (Atom)